Tuesday 30 August 2011

A.I.M. Methodology Summary

Application Implementation Method is a proven approach for all the activities required to implement oracle applications.
The scope of the AIM is focused on an enterprise as a whole.
There are eleven processes of implementation.
1. Business Process Architecture [BP]
This phase outlines:
  • Existing business practices
  • Catalog change practices
  • Leading practices
  • Future practices
2. Business Requirement Definition[RD]
This phase explains about the initial baseline questionnaire and gathering of requirements.
3. Business Requirement Mapping[BR]
In this phase the requirements of business are matched with the standard functionality of the oracle applications.
4. Application and Technical Architecture [TA]
This outlines the infrastructure requirements to implement oracle applications.
5. Build and Module Design [MD]
This phase emphasizes the development of new functionality (customization) required by the client. It mainly details how to design the required forms, database and reports.
6. Data Conversion [CV]
Data Conversion is the process of converting or transferring the data from legacy system to oracle applications.
Ex. Transferring customer records from the legacy to the Customer Master.
7. Documentation [DO]
Documentation prepared per module that includes user guides and implementation manuals.
8. Business System Testing [TE]
A process of validating the setup’s and functionality by QA(functional consultant) to certify status.
9. Performance Testing [PT]
Performance testing is the evaluation of transactions saving time, transaction retrieval times, workflow background process, database performance, etc…
10; Adoption and Learning [AP]
This phase explains the removal of the legacy system and oracle application roll out enterprise wide.
11. Production Migration [PM]
The process of “decommissioning” of legacy system and the usage(adoption) of oracle application system.

Monday 29 August 2011

AIM Document List

Business Process Architecture (BP)BP.010 Define Business and Process Strategy
BP.020 Catalog and Analyze Potential Changes
BP.030 Determine Data Gathering Requirements
BP.040 Develop Current Process Model
BP.050 Review Leading Practices
BP.060 Develop High-Level Process Vision
BP.070 Develop High-Level Process Design
BP.080 Develop Future Process Model
BP.090 Document Business Procedure

Business Requirements Definition (RD)RD.010 Identify Current Financial and Operating Structure
RD.020 Conduct Current Business Baseline
RD.030 Establish Process and Mapping Summary
RD.040 Gather Business Volumes and Metrics
RD.050 Gather Business Requirements
RD.060 Determine Audit and Control Requirements
RD.070 Identify Business Availability Requirements
RD.080 Identify Reporting and Information Access Requirements

Business Requirements MappingBR.010 Analyze High-Level Gaps
BR.020 Prepare mapping environment
BR.030 Map Business requirements
BR.040 Map Business Data
BR.050 Conduct Integration Fit Analysis
BR.060 Create Information Model
BR.070 Create Reporting Fit Analysis
BR.080 Test Business Solutions
BR.090 Confirm Integrated Business Solutions
BR.100 Define Applications Setup
BR.110 Define security Profiles

Application and Technical Architecture (TA)TA.010 Define Architecture Requirements and Strategy
TA.020 Identify Current Technical Architecture
TA.030 Develop Preliminary Conceptual Architecture
TA.040 Define Application Architecture
TA.050 Define System Availability Strategy
TA.060 Define Reporting and Information Access Strategy
TA.070 Revise Conceptual Architecture
TA.080 Define Application Security Architecture
TA.090 Define Application and Database Server Architecture
TA.100 Define and Propose Architecture Subsystems
TA.110 Define System Capacity Plan
TA.120 Define Platform and Network Architecture
TA.130 Define Application Deployment Plan
TA.140 Assess Performance Risks
TA.150 Define System Management Procedures

Module Design and Build (MD)MD.010 Define Application Extension Strategy
MD.020 Define and estimate application extensions
MD.030 Define design standards
MD.040 Define Build Standards
MD.050 Create Application extensions functional design
MD.060 Design Database extensions
MD.070 Create Application extensions technical design
MD.080 Review functional and Technical designs
MD.090 Prepare Development environment
MD.100 Create Database extensions
MD.110 Create Application extension modules
MD.120 Create Installation routines

Data Conversion (CV)CV.010 Define data conversion requirements and strategy
CV.020 Define Conversion standards
CV.030 Prepare conversion environment
CV.040 Perform conversion data mapping
CV.050 Define manual conversion procedures
CV.060 Design conversion programs
CV.070 Prepare conversion test plans
CV.080 Develop conversion programs
CV.090 Perform conversion unit tests
CV.100 Perform conversion business objects
CV.110 Perform conversion validation tests
CV.120 Install conversion programs
CV.130 Convert and verify data
Documentation (DO)
DO.010 Define documentation requirements and strategy
DO.020 Define Documentation standards and procedures
DO.030 Prepare glossary
DO.040 Prepare documentation environment
DO.050 Produce documentation prototypes and templates
DO.060 Publish user reference manual
DO.070 Publish user guide
DO.080 Publish technical reference manual
DO.090 Publish system management guide
Business System Testing (TE)
TE.010 Define testing requirements and strategy
TE.020 Develop unit test script
TE.030 Develop link test script
TE.040 Develop system test script
TE.050 Develop systems integration test script
TE.060 Prepare testing environments
TE.070 Perform unit test
TE.080 Perform link test
TE.090 perform installation test
TE.100 Prepare key users for testing
TE.110 Perform system test
TE.120 Perform systems integration test
TE.130 Perform Acceptance test
PERFORMACE TESTING(PT)
PT.010 – Define Performance Testing Strategy
PT.020 – Identify Performance Test Scenarios
PT.030 – Identify Performance Test Transaction
PT.040 – Create Performance Test Scripts
PT.050 – Design Performance Test Transaction Programs
PT.060 – Design Performance Test Data
PT.070 – Design Test Database Load Programs
PT.080 – Create Performance Test TransactionPrograms
PT.090 – Create Test Database Load Programs
PT.100 – Construct Performance Test Database
PT.110 – Prepare Performance Test Environment
PT.120 – Execute Performance Test
Adoption and Learning (AP)
AP.010 – Define Executive Project Strategy
AP.020 – Conduct Initial Project Team Orientation
AP.030 – Develop Project Team Learning Plan
AP.040 – Prepare Project Team Learning Environment
AP.050 – Conduct Project Team Learning Events
AP.060 – Develop Business Unit Managers’Readiness Plan
AP.070 – Develop Project Readiness Roadmap
AP.080 – Develop and Execute CommunicationCampaign
AP.090 – Develop Managers’ Readiness Plan
AP.100 – Identify Business Process Impact onOrganization
AP.110 – Align Human Performance SupportSystems
AP.120 – Align Information Technology Groups
AP.130 – Conduct User Learning Needs Analysis
AP.140 – Develop User Learning Plan
AP.150 – Develop User Learningware
AP.160 – Prepare User Learning Environment
AP.170 – Conduct User Learning Events
AP.180 – Conduct Effectiveness Assessment
Production Migration (PM)
PM.010 – Define Transition Strategy
PM.020 – Design Production Support Infrastructure
PM.030 – Develop Transition and Contingency Plan
PM.040 – Prepare Production Environment
PM.050 – Set Up Applications
PM.060 – Implement Production Support Infrastructure
PM.070 – Verify Production Readiness
PM.080 – Begin Production
PM.090 – Measure System Performance
PM.100 – Maintain System
PM.110 – Refine Production System
PM.120 – Decommission Former Systems
PM.130 – Propose Future Business Direction
PM.140 – Propose Future Technical Direction

Export data from Excel to Table using custom Web ADI Integrator

Case: User needs a function XXFunc in responsiblity XXResp which creates Excel document and allows user to upload data from Excel sheet to custom Table. Pre-Req
For Microsoft Excel 2002 or 2003:
1.From the Tools menu, select Macro, then Security, and then Security Level.
2.In the Security Level tab, select the High option.
3.In the Trusted Sources or Trusted Publishers tab, select the Trust access to Visual Basic Project option.

For Microsoft Excel 2007:
1.Choose the Microsoft Office button, and then choose Excel Options. In the Trust Center category, choose Trust Center Settings, and then the Macro Settings category.
2.Select the Disable all macros except digitally signed macros option.
3.Select the Trust access to the VBA project object model option.Set profile option 'BNE Allow No Security Rule' to Yes at user level. The default value is No.
Add responsibilities 'Desktop Integration Manager', 'Desktop Integrator' to the current user.


Steps
1.Create custom table 'XX_ONT_WEBADI_TEST'. Create custom API 'XX_ONT_WEBADI_TEST_PKG' which validates and inserts data into custom table.
2.Create Integrator 'XX ONT ADI Test Integrator'.
3.Create Interface 'XX ONT ADI Test Interface' to the above integrator and set custom API 'XX_ONT_WEBADI_TEST_PKG' to the interface.
4.Create Contents(Optional).
5.Create Layout 'XX ONT ADI Test Layout' and set to integrator 'XX ONT ADI Test Integrator'.
6.You can test at this stage from Desktop Integrator responsiblity.

7.Create Function 'XX ONT ADI Test Func' and set integrator to the function. Attach this function to the menu under resposibility.
8.Navigate to Resposibility->Menu->XX ONT ADI Test Func. Opens OA Page. Click on Create Document button opens Excel Sheet.

Detailed Steps
1.Create custom table 'XX_ONT_WEBADI_TEST'. Create custom API 'XX_ONT_WEBADI_TEST_PKG' which validates and inserts data into custom table. Paremeters in procedure Load_Prc() should be the columns in the table which you want to update using Web ADI integrator.

2.Create Integrator 'XX ONT ADI Test Integrator'.
Navigation: Desktop Integration Manager(R)->Create Integrator
Enter name, internal name and application.
Must select 'Display In Create Document Page' checkbox which allows current integrator available for creating document(Excel). Click Next.
3.Create Interface 'XX ONT ADI Test Interface' to the above integrator and set custom API 'XX_ONT_WEBADI_TEST_PKG' to the interface. Click Apply.
In next screen, click Select radio button of interface 'XX ONT ADI Test Interface' and wait. This reads API given in the interface and loads procedure parameters as attributes. Click Next.
4.Create Contents(Optional). Click Submit.
5.Create Layout 'XX ONT ADI Test Layout' and set to integrator 'XX ONT ADI Test Integrator'.
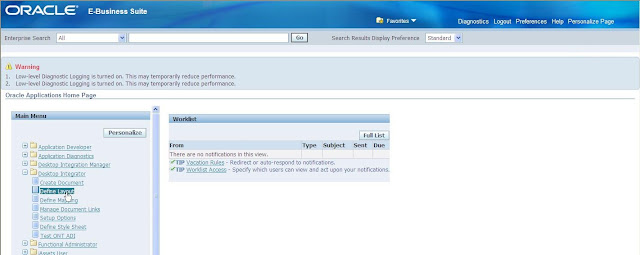
Navigation: Desktop Integrator(R)->Define Layout

Select integrator 'XX ONT ADI Test Integrator' from dropdown. Click Go.
This screen shows exisitng layouts if there are any. Click on Create button to create one.
Provide layout name as 'XX ONT ADI Test Layout' and select no.of headers 1. Click Next.
This picks integrator attributes as layout fields. Select Placement as 'Line' and provide default values if there are any required. Click Apply.
Layout created successfully.
6.Test from Desktop Integrator responsiblity.
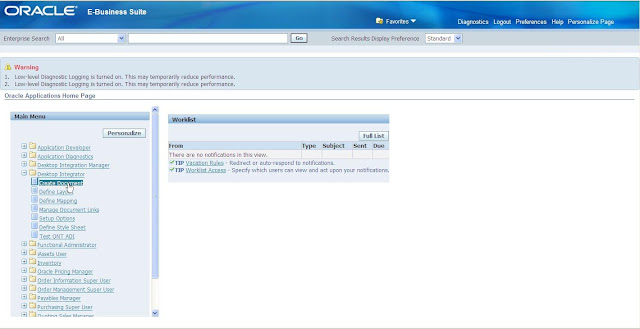
Navigation: Desktop Integrator(R)->Create Document

Select integrator as XX ONT ADI Test Integrator. Click Next.

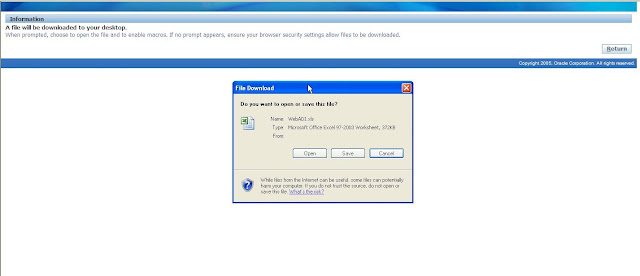
In Review stage, Click Create Document button. This opens popup window to Open/Save a file WebADI.xls. Click Open button.

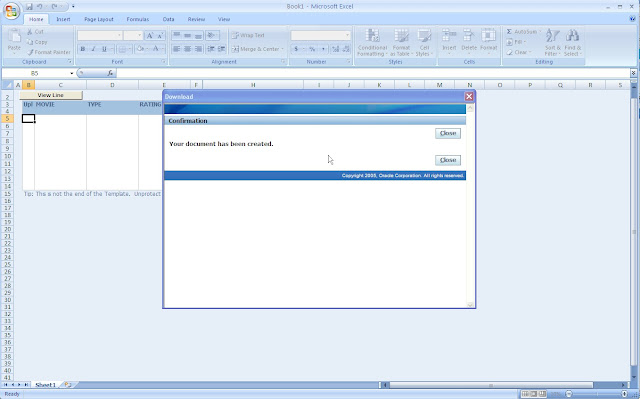
This opens Excel sheet with format given in layout 'XX ONT ADI Test Layout'. Close Download OA window.
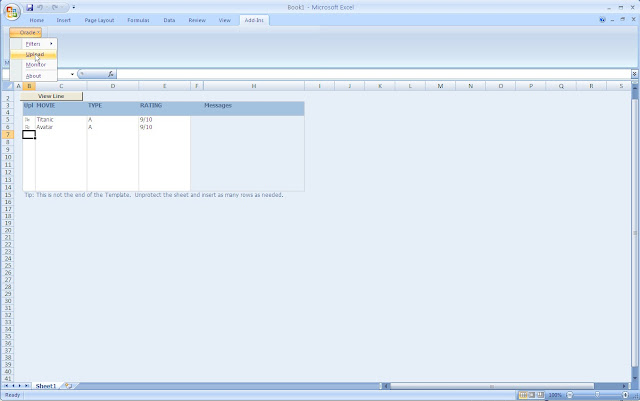
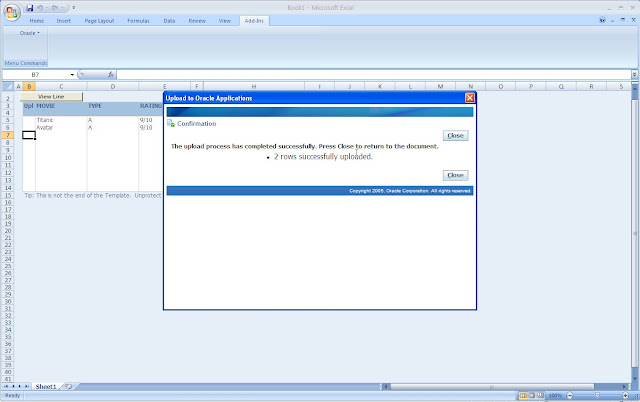
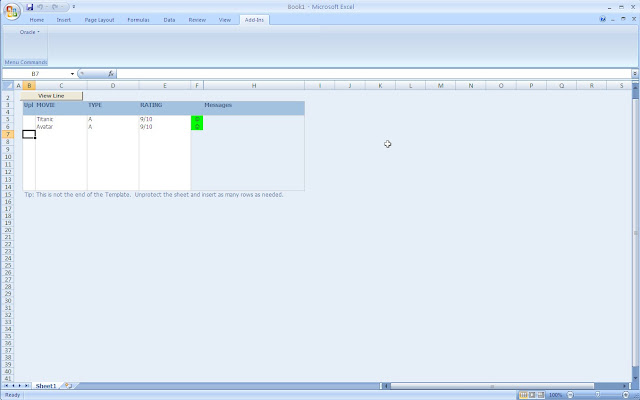
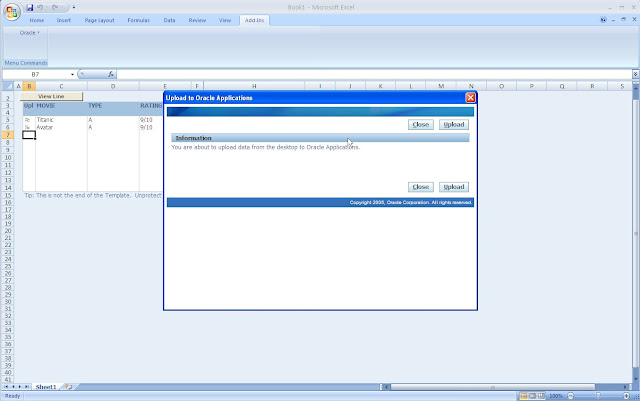
Enter Data into excel sheet. To upload data into table, navigate to Add-Ins(M)->Oracle->Upload from excel sheet menu on top. This opens Upload window. Click on Upload button. Once data is successully uploaded, excel sheet shows green icon for each line indicates no errors in upload.
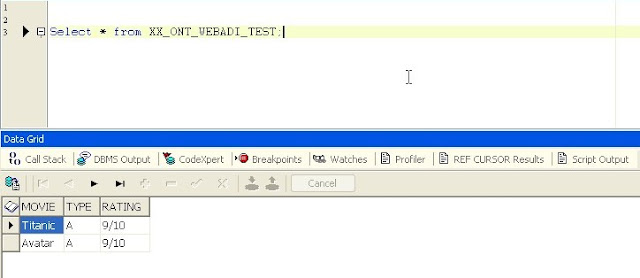
Check same from backend.
7.Create Function 'XX ONT ADI Test Func' and set integrator to the function. Attach this function to the menu under resposibility.
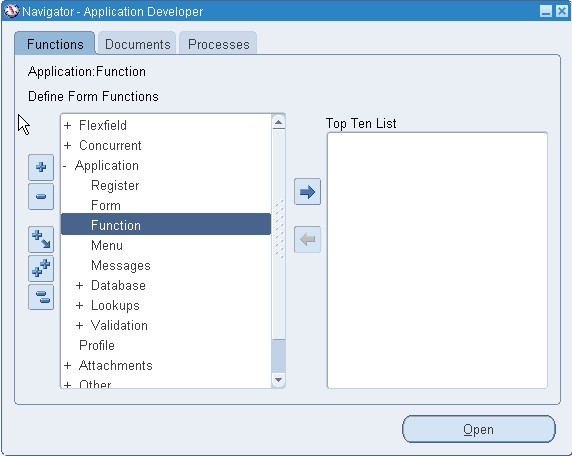
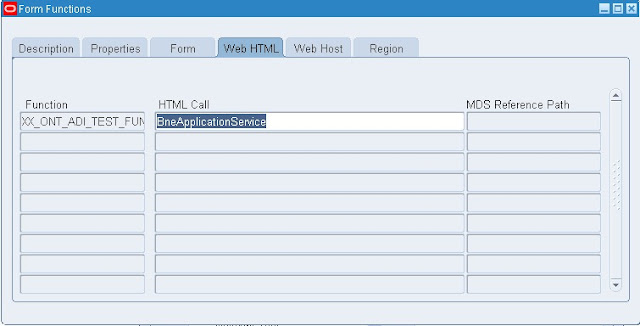
Navigation: Application Developer(R)->Application->Function

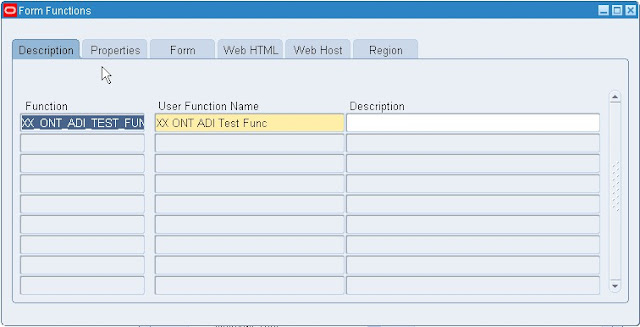
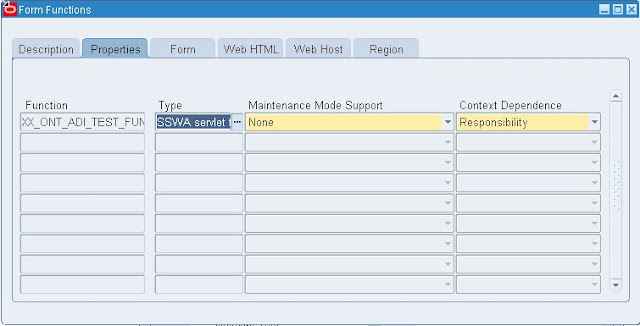
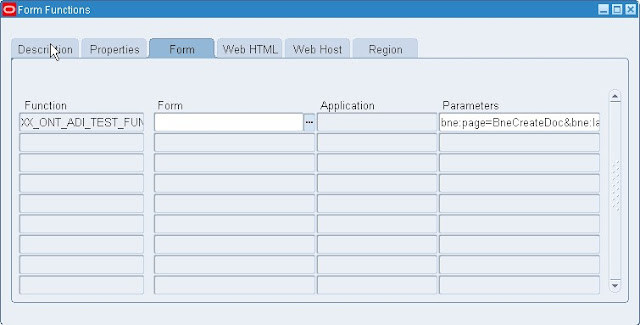
Create function as shown in below screens.

In the next screen you need to set form parameter. Modify below string and set correct integrator, layout and content details.
bne:page=BneCreateDoc&bne:language=US&bne:reporting=N&bne:viewer=BNE:EXCEL2000,2003,2007&bne:integrator=XXONT:XXGF_TEST1_INTG_INTG&bne:layout=XXONT:XXGF_TEST1_INTG_DFLT&bne:content=XXONT:XXGF_TEST1_INTG_CNT


Add function 'XX ONT ADI Test Func' to menu. Prompt given as 'ADI Test Load'.
8.Navigate to Resposibility->Menu->ADI Test Load. This opens OA page. Click on Create Document button to open new excel sheet with layout.

Oracle Web ADI


Oracle WEB ADI- Oracle Web Application Desktop Integrator
  • Wed ADI automatically imports data into your Web ADI spreadsheets from the Oracle E-Business Suite or from a text file. Imported information can be quickly modified in Excel, validated, and uploaded to the Oracle E-Business Suite.
  • This feature can be useful when migrating data from a legacy system to the Oracle E-Business Suite.
  • All data in the spreadsheet can be validated against Oracle E-Business Suite business rules before it is uploaded.
  • You can use the layout functionality to determine what fields appear in your spreadsheet, where they appear, and if they contain default values. These definitions can be saved, reused, and modified as needed.

Concepts
Integrator – This is the definition that stores the information about the action the user wishes to perform. For example, downloading specific data to a spreadsheet for viewing or to modify and upload back to the database. For ADE sers, this equated to the Style.
API – Application Programming Interface. This is the pl/sql interface by which data is validated and uploaded into Oracle HRMS. You would associate an api with an integrator if it was intended to either create new data in the application or update data that had been previously downloaded. See Oracle HRMS Configuring,Reporting and System Administration manual for a list of supported apis.
View – A view is an object by which you can query data on a table or tables. If the action you are intending to perform involves downloading data, you must associate a view with the integrator. If you are using Create style APIs, you do not require a view. You can elect to use a seeded view, for example, PER_PEOPLE_V, to use with your integrator. However, if the integrator is for updating data, then it is recommended that you create your own views and remember to include the OBJECT_VERSION_NUMBER, and any other In/Out parameters used by your chosen API.
One thing to beware of is the use of Aliases in views if you are downloading from a form. For example,if you use an alias for Applicant_Name called Starter, and then use a restrictive query in the form on Applicant Name before running the integrator in Web ADI, you will get the following error in the BNE log.
BneBaseSQL.executeBneQuery: Exception while running query. Error Code: 904, Message: ORA-00904: "APPLICANT_NAME": invalid identifier
The column APPLICANT_NAME has been overwritten by the alias in the definition loaded into the BNE tables.
Layout – This is where the user selects the columns to be displayed in the spreadsheet or Word document from the API and/or View used by the integrator. An integrator can have more than one layout defined for it. You can choose which one to use when you create your document.
Mapping – the mapping definition links the data source to the api columns. If no view is specified against the integrator or no text file used to load data, then no mapping is needed. When the data source is a view, the mapping is created automatically, however if a text file is being used then a mapping needs to be manually defined to associate each column in the file (source) to the relevant api parameter (target). See example c) in section, A Step by Step Guide to Creating HRMS Integrators.

Pre-req
For Microsoft Excel 2002 or 2003:
1.From the Tools menu, select Macro, then Security, and then Security Level.
2.In the Security Level tab, select the High option.
3.In the Trusted Sources or Trusted Publishers tab, select the Trust access to Visual Basic Project option.

For Microsoft Excel 2007:
1.Choose the Microsoft Office button, and then choose Excel Options. In the Trust Center category, choose Trust Center Settings, and then the Macro Settings category.
2.Select the Disable all macros except digitally signed macros option.
3.Select the Trust access to the VBA project object model option.
Set profile option 'BNE Allow No Security Rule' to Yes at user level. The default value is No.
Add responsibilities 'Desktop Integration Manager', 'Desktop Integrator' to the current user.

Debugging
You can get a log file to help diagnose an error in Web ADI. The following profile options need to be set:
BNE: Server Log Filename: Use this profile option to change the name of the Web ADI log file on the middle tier. If this profile option is not set, bne.log is used.
BNE: Server Log Path: This profile option can be used to set the directory for the Web ADI log file on the applications server. If this profile option is not set, then the FND_TOP/log directory is used.
BNE: Server Log Level: This profile option determines the level of detail that is recorded in the Web ADI log file. The valid values are noted below. The level of granularity and amount of information recorded to the log file increases as you move down the list.
  • CRITICAL_ERROR: - Messages that are the result of a system failure. The integrity and reliability of the system is in doubt as a result of this error.
  • ERROR: - Messages that are the result of an unexpected error in the system. It is possible to recover from these errors; the system may still be in a usable state. Setting the profile option to this value will include CRITICAL_ERROR messages in the log file.
  • WARNING: - Messages trapped by the application.These errors were handled by the application but the system administrator should be aware of them occurring. Setting the profile option to this value will include ERROR and CRITICAL_ERROR messages as well.
  • INFORMATION: - Additional messaging is added to the log file that includes processing information. Setting the profile option to this value includes CRITICAL_ERROR, WARNING, and ERROR log messages. This is the setting that is used by Web ADI if the profile option is not set at the site level.
  • DETAIL: - Messages that summarize what is written to the log file. Setting the profile option to this value includes CRITICAL_ERROR, WARNING, ERROR, and INFORMATION log messages.
  • TRACE: - Messaging that generated detailed debugging statements. Setting the profile option to this value includes CRITICAL_ERROR, WARNING, ERROR, INFORMATION and DETAIL log messages.

Main Tables and API

BNE_INTEGRATORS_TL
BNE_INTERFACES_TL
BNE_INTERFACE_COLS_TL
BNE_CONTENTS_TL
BNE_MAPPINGS_TL
BNE_LAYOUTS_TL
BNE_LAYOUT_COLS

API to create custom web adi programatically..
BNE_INTEGRATOR_UTILS.CREATE_INTEGRATOR
BNE_INTEGRATOR_UTILS.CREATE_INTERFACE_FOR_API
BNE_INTEGRATOR_UTILS.CREATE_DEFAULT_LAYOUT
BNE_INTEGRATOR_UTILS.CREATE_TABLE_LOV
BNE_INTEGRATOR_UTILS.CREATE_CCID_KFF
BNE_INTEGRATOR_UTILS.CREATE_JAVA_LOV

Create Custom WebADI Integrators


Web Applications Desktop Integrator (Web ADI) is a self-service Oracle application, accessed using a browser. Unlike ADI, the Web ADI software is not installed on individual client machines, as the processing takes place on the server rather than on individual client PCs.
Web ADI generates Microsoft Excel or Word documents on your desktop, and downloads the data you have selected from the application. You can modify the data in the Microsoft Excel or Word documents, working either online or offline, and upload the data using Web ADI. In addition to the Web ADI integrators supplied with Oracle Applications, you can create your own integrators to allow download and upload data from Oracle windows or direct from Web ADI.
Except for HRMS, it seems to me that other Oracle Development teams have not utilized Web ADI to its full potential. There were some discussions in forums and Oracle blogs on whether this approach is even needed. I feel like every available interface and API that let you integrate with legacy or 3rd party applications should come with a standard Web ADI integrator.
Creating Custom Integrators
Thanks to the HRMS Web ADI, you can define your own custom HRMS and non-HRMS integrators and in a combination with the seeded Oracle APIs and interfaces, implement elegant solutions for downloading or uploading data. Examples for frequently used custom integrators include upload of employees, users, POs and requisitions, AP invoices, project events, AR transactions, etc.
Creating custom integrators is done by a system administrator. Let’s define an integrator to create employees to explain how to create custom integrators. Employees and employee assignments can be created using the standard HR_EMPLOYEE_API. Our custom integrator will upload data to this API.
Grant Access to Required Functions
As System Administrator, navigate to Application > Menu, and query up ‘Desktop Integration Menu’. Make sure to include functions required for respective integrators. In case of custom Create Employee integrator, you’ll need to include the following functions (no prompts are necessary):
  • HR Integrator Setup Integrator
  • HR Maintain Integrator Form Functions Integrator
Create ‘HR Integrator Setup’ Web ADI Document
  • Log in as Desktop Integration responsibility. Select Create Document from the menu. The Settings page of the Web ADI wizard appears.
  • In the Settings page, select a spreadsheet viewer in the Viewer field. Keep the Reporting check box unchecked, as this integrator is used to upload data to the database.
  • In the Integrator page, select the seeded integrator “HR Integrator Setup”.
  • In the Layout page, select the default layout “HR Integrator Setup”.
  • In the Content page, select None.
  • In the Review page, you can see full details of the document that will be created. Choose the Back button if you want to change any of the information, or choose the Create Document button to continue.
  • A spreadsheet document is created, containing all the fields you need to enter to create your own integrator.
  • Define all fields to create your Create Employee integrator and upload it to the database.
Controlling Access to Custom Integrators
Custom integrators, like predefined integrators, must be associated with form functions. Follow the steps below to associate your Create Employee integrator with the functions required to define Web ADI layout and Web ADI document.
  • Select Create Document from the Web ADI menu.
  • Select a spreadsheet viewer. Leave the Reporting check box unselected to download data for updating.
  • Select HR Maintain Integrator Form Functions Integrator.
  • Enter the Application Short Name (for example, your custom application name). Optionally, enter the integrator name.
  • The displayed spreadsheet shows your selected custom integrators, and has a column for associating form functions. Enter the form function required for controlling access to the integrator.
  • Upload your changes to the database.
Define Layout of Custom Integrator
Each integrator must have at least one layout specifying the columns to appear in the spreadsheet. To define a layout:
  • Choose Define Layout from the Web ADI menu. The Layout page appears.
  • Select the integrator for which you want to define the layout, and choose Go.
  • Choose the Define Layout button to define a new layout.
  • In the Define Layout page, enter a unique name for the layout. This appears whenever the user is required to select the layout, so should clearly indicate the purpose of the layout.
  • Enter a unique key. The key is used internally by the system to identify the mapping.
  • The Field List defaults to the complete list of columns available in the view or API.
  • Choose Continue. In case of Create Employee integrator, the layout is based on the the HR_EMPLOYEE_API columns. In the next page, you select a subset of these fields to include in your layout.
Create ‘Create Employee’ Spreadsheet
And finally, using the custom integrator and layout defined above, create a new ‘Create Employee’ WebADI upload spreadsheet:
  • From the Navigator window (Oracle Personal Home Page), click on ‘Desktop Integration’ responsibility. The Settings page of the Web ADI wizard appears.
  • In the Settings page, select a spreadsheet viewer in the Viewer field. Keep the Reporting check box unchecked, as this integrator is used to upload data to the database.
  • In the Integrator page, select your new integrator ‘Create Employee’.
  • In the Layout page, select the default layout “Create Employee”.
  • In the Content page, select None.
  • In the Review page, you can see full details of the document that will be created. Choose the Back button if you want to change any of the information, or choose the Create Document button to continue.
  • A spreadsheet document is created and ready to use for creating employees.
  • Save a local copy to your PC.

Oracle Discoverer Viewer


How to display the Discoverer Viewer connections page
You display the Discoverer Viewer connections page to select a connection (i.e. a
stored set of database login details) to start Discoverer Viewer or to connect to
Discoverer Viewer directly. You can also use the Discoverer Viewer connections page
to edit and delete Discoverer connections.
To display the Discoverer Viewer connections page:
ü Launch a Web browser.
ü Go to the Discoverer web address given to you by the Discoverer manager
Hint: The Discoverer web address might be:
ü the default web page that you access when you start a browser
ü an internet address (URL) that you enter in the address field in a browser (e.g.
a typical URL might be http://machinename.myorganization.com:7777/discoverer/viewer)
ü a link from a portal or other internet or intranet site that you are using
ü
The Connect to OracleBI Discoverer page is displayed.
ü A list of the existing Discoverer connections is displayed in the Connection column
How to start Discoverer Viewer using an existing connection
When you start Discoverer Viewer using an existing connection, you can use one of
the following:
ü an existing public connection created by the Discoverer manager
ü an existing private connection that you created earlier
To start Discoverer Viewer using an existing connection:
1. Display the Discoverer Viewer connections page (for more information, see "How
a. to display the Discoverer Viewer connections page").
2. Select the name of a connection name in the Connection column to start Discoverer Viewer.
Hint: To confirm that you are using the correct connection, click Show in the
Details column to display more information about a connection. To hide additional
information, click Hide.
Note: If you have already used Oracle’s Single Sign-On functionality to establish a
database connection, you will not be prompted for password information when
you start Discoverer Viewer.
Discoverer Viewer starts and displays the "Worksheet List page", which enables
you to locate and select a worksheet to open.
You
You can open any worksheet accessible to the database username used in the
current connection. If you cannot see the worksheet that you want to open, you
might need to use a different connection.
3. Select the + icon next to a workbook to display the worksheets contained in that
workbook (or select the icon in the Focus column next to a workbook).
4. Select the name of the worksheet you want to analyze in the Name column.
Discoverer Viewer displays the selected worksheet.

How to start Discoverer by connecting directly
You start Discoverer by connecting directly when you want to connect to Discoverer
but you do not want to save the login details for use later.
To start Discoverer by connecting directly:
1. Display the Discoverer Viewer connections page (for more information, see "How
to display the Discoverer Viewer connections page").
2. Select the Connect Directly link to display the Connect Directly area.
3. Enter login details using the fields provided (e.g. User Name, Password,
Database).
4. Click Go to start Discoverer.
Discoverer Viewer starts and displays the "Worksheet List page", which enables
you to locate and select a worksheet to open.
5. Select the + icon next to a workbook to display the worksheets contained in that
workbook (or select the icon the Focus column next to a workbook).
6. Select the name of the worksheet you want to analyze in the Name column.
Discoverer Viewer displays the selected worksheet.
How to exit Discoverer Viewer
When you have finished using Discoverer Viewer to analyze data, exit the application.
To exit Discoverer Viewer:
1. Select the Exit link in the header area or footer area of the Discoverer Viewer page.
How to open a Discoverer worksheet
You open a Discoverer worksheet to analyze the data in that worksheet. You can
display one worksheet at a time (though you can create multiple Discoverer Viewer
browser sessions).
To open a Discoverer worksheet:
1. Start Discoverer Viewer (for more information, see Chapter 2, "Starting Discoverer
Viewer").
Discoverer starts and displays the "Worksheet List page", which enables you to
locate and select a worksheet to open.
How to open a Discoverer worksheet
3-2 Oracle Business Intelligence Discoverer Viewer User’s Guide
2. Select the + icon next to the workbook containing the worksheet you want to open
to display the worksheets in that workbook (or select the icon the Focus column
next to a workbook).
3. Select the name of the worksheet you want to analyze in the Name column.
Discoverer displays the selected worksheet.
How to save worksheets
If you change a worksheet and then switch to a different worksheet, Discoverer
prompts you to save the changes you have made or discard the changes.
To save a worksheet:
1. Display the worksheet that you want to save.
If you own the worksheet, both the Save and Save As options are available. If you
do not own the worksheet, only the Save As option is available.
2. Save the worksheet as follows:
If you own the worksheet, do one of the following:
to save changes to the worksheet, select the Save link
to save the worksheet in a workbook with a different workbook name, select
the Save As link to display the Save Workbook As page and specify a new
workbook name
How to preview worksheets before printing
3-4 Oracle Business Intelligence Discoverer Viewer User’s Guide
If you do not own the worksheet, to save the worksheet in a workbook as a
different workbook name, select the Save As link to display the Save Workbook As
page and specify a new workbook name.
Discoverer saves the worksheet in the database in the current workbook. If you use the
Save As option, workbooks are always stored in the root folder.
How to print worksheets
1. Display the worksheet that you want to print.
2. Select the Printable Page link to display the "Printable Page Options page: Content
tab".
3. (optional) Use the "Printable Page Options page: Content tab" to change the print
settings, if required.
4. (optional) If you want to preview a sample PDF version of the worksheet before
printing the full worksheet, follow the steps in "How to preview worksheets
before printing".
5. Click Printable PDF to display the "PDF Ready page".
Exporting Discoverer worksheets
Analyzing data with Discoverer Viewer 3-5
6. Select the Click to view or save link to display the full PDF version of the
worksheet in a separate browser window.
Note: You can now view, print, or save the PDF file.
7. In the separate browser window displaying the PDF file, choose File | Print to
display the operating system print dialog and print the PDF file.
Discoverer prints the PDF version of the worksheet.
How to export Discoverer worksheets
To export a Discoverer worksheet:
1. Display the worksheet that you want to export (for more information, see "How to
open a Discoverer worksheet").
2. Select the Export link in the Actions area to display the "Choose export type page".
3. Select an export type from the droap down list and click Export to display the
"Export Ready page".
4. Click the Click to view or save button to display the exported file in the
application associated with that file type.
Discoverer displays the exported file in the application associated with that type of
export file (e.g. a browser, Microsoft Excel).
5. (optional) If you want to save the exported file, save the file in the application
used for that type of export file (e.g. Microsoft Excel).
What does Discoverer do when you export worksheet data using the XLS file
format?
When you export relational worksheet data to the XLS file format, Discoverer:
Exporting Discoverer worksheets
3-6 Oracle Business Intelligence Discoverer Viewer User’s Guide
¦ sets the MimeType of the worksheet output to application/vnd.ms-excel
¦ requests the file name to be .xls
¦ formats worksheet output to be readable by Microsoft Excel
On a machine where Microsoft Excel is installed, the operating system typically
associates the XLS file with Microsoft Excel.
Note: When you export a worksheet to the XLS file format, it is recommended that you
save the XLS file and then open the saved XLS file in Microsoft Excel.
For more information about exporting worksheet data, see "Choose export type page".
How to send Discoverer worksheets in an email
You can send a copy of the currently displayed worksheet to one or more email
recipients in a range of formats.
To send a Discoverer worksheet in an email:
1. Display the worksheet that you want to send (for more information, see "How to
open a Discoverer worksheet").
2. Select the Send as email link in the Actions area to display the "Choose
attachment type (send as email attachment)".
3. Select an export type from the droap down list and click Next to display the "Send
Email page".
4. Use the "Send Email page" to enter the email addresses of the intended email
recipients, and create the email message.
5. (optional) If you want to display the attached worksheet file, click View
Attachment, to display the worksheet in an appropriate software package (e.g.
Microsoft Excel).
6. Click Finish to send the email.
Note: Discoverer sends the email using the IMAP settings specified by the Discoverer
manager.
Note: Discoverer sends the email as a Zip file using the IMAP settings specified by the
Discoverer manager.
What is a conditional format?
A conditional format enables you to highlight worksheet values that meet a specific
condition. For example, you might want to highlight profit values greater than 30,000.
Note: In Discoverer Desktop, conditional formats are known as exceptions.
In the example below, a conditional format highlights Profit SUM values greater than
30,000. The Profit SUM figures for Cincinnati and Louisville are displayed with a blue
background because they are greater than 30,000.
Figure 3–1 A Discoverer worksheet using a conditional format
What is a stoplight format?
A stoplight format (or traffic light format) enables you to categorize numeric
worksheet values as unacceptable, acceptable, and desirable using different colors. The
default stoplight format uses the familiar red, yellow, and green color scheme to
represent unacceptable, acceptable, and desirable values.
For example, you might want to categorize performance based on profit values where:
¦ values less than or equal to 10,000 are unacceptable, and are shown in red
¦ values between 10,001 and 29,999 are acceptable, and are shown in yellow
¦ values equal to or greater than 30,000 are desirable, and are shown in green
In the example below, a stoplight format based on the above values is used to
categorize Profit SUM values. Values in the unacceptable category are show in red (e.g.
Chicago and Dallas). Values in the acceptable category are shown in yellow (e.g. St.
Louis and Washington). Values in the desirable category are shown in green (e.g.
Cincinnati and Louisville).
Figure 3–2 A Discoverer worksheet using a stoplight format